Samsa Samsa

What is a packshot? Requirements, formats and how to create one

A packshot is a clean, true-to-life image of a product and its packaging, usually shown alone on a plain white background. Marketplaces set the rules: Zalando requires pure white (#FFFFFF) and at least 762 × 1,100 pixels; Google Merchant Center wants at least 500 × 500 pixels, with the product filling 75–90% of the frame. You can shoot it in a studio, render it from CAD files or generate it with an AI model trained on your product.

What is a packshot?

A packshot is the product image whose only job is recognition: the product, usually with its packaging and label, shown on its own, evenly lit, with no scene around it. Wikipedia defines it as a still or moving image of a product, usually including its packaging and labelling, used in TV and other advertising to trigger recognition in store and on the shelf.

In e-commerce the word has narrowed to the main product image, the one shown first on a product page and in search results, and that is the image marketplaces write rules for. A packshot is a spec, not a style. Know your marketplace’s rules and the production route follows.

Packshot, product shot, cut-out: the terms

  • Packshot (also pack shot): the neutral, standardised image of a product, usually with its packaging. In an online shop, the main image.
  • Product shot: any photo whose subject is the product, staged scenes included. Every packshot is a product shot, not the other way round.
  • Cut-out (or clipping): the product separated from its background, so it can sit on pure white or on a transparent background. Most studio packshots are cut out after the shoot.
  • 360° spin: a sequence of frames around the product that the viewer can rotate, shot on a turntable or rendered from a 3D model. A format of its own, not a packshot.

Packshot or lifestyle shot: what’s the difference?

A packshot shows only the product, neutral and standardised; a lifestyle shot shows it in a setting or in use, to create a mood. Marketplaces want the packshot as the main image and file lifestyle shots under additional views. Zalando says so directly: an image with ambient styling is not a compliant packshot and can only be used as an additional view.

The two do different jobs. In a search grid, the packshot tells the shopper this is the product they were looking for; on the product page and in ads, the lifestyle shot shows what owning it is like. A catalogue needs both, and its packshots need to match from product to product: same light, same angle, same margins.
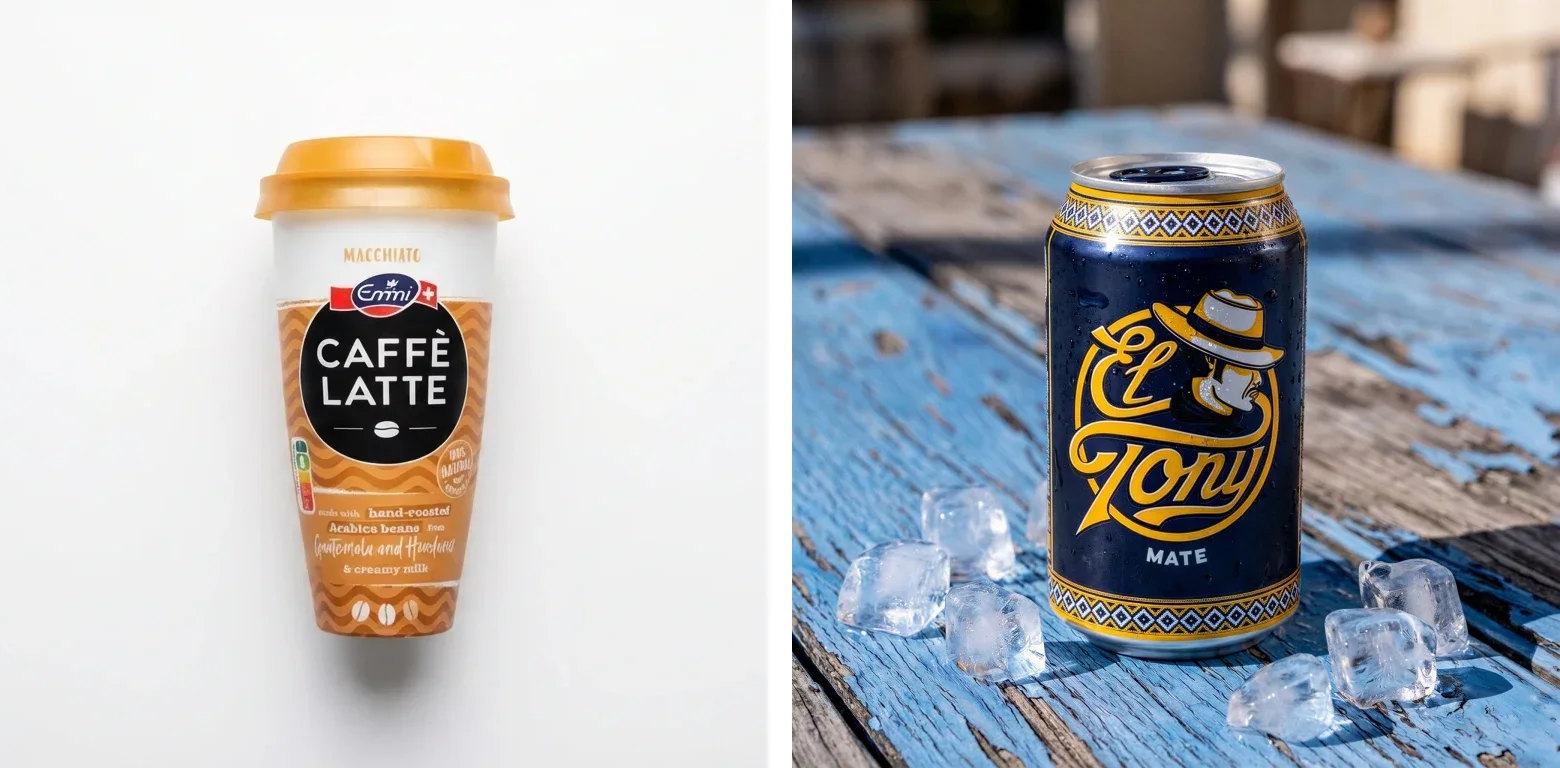
Left, a caffè latte cup alone on a light backdrop; right, a mate can with ice cubes on a weathered blue wooden table
Left a packshot, right a lifestyle shot. The packshot’s backdrop is a light grey, about RGB 232 to 250, not pure white, so Zalando’s catalogue image would still need a #FFFFFF background. Examples generated with Samsa, not customer projects.

What do marketplaces require for a packshot?

Every marketplace publishes its own image rules, and they differ more than most guides admit: of the four below, only Zalando makes pure white mandatory, and the minimum sizes run from 500 pixels on the longest side to 762 × 1,100 pixels. Values as published on each marketplace’s own pages on 30 September 2026.

Packshot rules of four marketplaces, from their own guidelines, as of 30 September 2026
RuleGoogle Merchant CenterZalando (catalogue packshot)Galaxus (main image)Amazon
BackgroundNo colour rule; no bordersPure white, R255 G255 B255 / #FFFFFF, mandatoryCut-out, ideally frontal on whiteWhite, RGB 255, 255, 255, “in most cases”
Minimum size500 × 500 px762 × 1,100 px600 px on the longest edge, without margins500 px on the longest side (max. 10,000)
Recommended sizeAbout 1,500 × 1,500 px or more1,801 × 2,600 px (designer brands: at least 1,800 × 2,600)–Over 1,000 px on each side, for zoom
Product fill75–90% of the image––85% of the frame or more
Aspect ratio–1:1.44, upright––
File formatsJPEG, WebP, PNG, GIF, BMP, TIFFJPG/JPEGJPG, JPEG, PNGJPEG preferred; TIFF, PNG, non-animated GIF
Max. file size16 MB and 64 megapixels20 MB8 MB–
Colour space–sRGB––
Not allowedBorders, watermarks, calls to action, prices and offers, logos added in post-production, placeholders, products not sold togetherAmbient styling, visible mannequins or hangers, black-and-white, cropping of the article on the primary packshotPlaceholders, advertising text, logos, watermarks, awards, generic illustrations, several variants in one imageListed in Seller Central (seller login)

A dash means the page sets no value, not that anything goes. Zalando’s guide is the general one; beauty, accessories, electronics and other categories have their own. Amazon’s figures come from its public seller guide on product photos; the binding main-image rules sit in Seller Central, behind a seller login.

Background: pure white, and why the rules differ

Pure white means RGB 255, 255, 255 (#FFFFFF). Zalando requires exactly that for its catalogue packshot, then adds its own light grey background in the shop so every product page looks the same. Galaxus asks for a cut-out on white, Amazon for white in most cases, and Google sets no colour at all, only a clean view without borders.

Pure white rarely comes straight out of the camera. A white backdrop often records as light grey, like the backdrop in the example above, so studios cut the product out and set the background to #FFFFFF afterwards. Rendered and AI images need the same check: look at the corner pixels before you upload. Background removal does the cut-out in one step.

Image size, product fill and zoom

The minimums are easy to meet; plan for the recommended sizes instead, such as the more than 1,000 pixels per side Amazon prefers so shoppers can zoom. Product fill decides how big the product looks in a search grid: 75 to 90% of the image at Google, 85% or more at Amazon. Galaxus measures its 600 pixels without the margins around the product, so a small product in a wide white field can miss the minimum even when the file itself is large.

File formats, colour space and file size

JPEG is the one format all four accept, and the only one Zalando takes. The tightest file size cap is Galaxus’ 8 MB, and Zalando is the only one of the four that names a colour space, sRGB. Samsa exports WebP, JPG and PNG; for a marketplace upload, JPG is the safe choice, and for Zalando check that the file is sRGB.

What is not allowed on the main image?

The bans are much the same everywhere: nothing on the image that isn’t the product. No calls to action such as “Buy now”, no prices, no watermarks, no logos added afterwards, no placeholders. On top, Google excludes products not sold with the item, Galaxus several variants in one image, and Zalando mannequins, hangers and any cropping of the article on the primary packshot.

Which views and formats does a product need?

One frontal main image is the minimum, and most marketplaces want more. Zalando asks for three compliant images for most apparel and accessories, and Amazon says every product must have at least one image and recommends at least six. A practical set for product photography on a white background:

  • Front: the main image, straight on, label readable.
  • Three-quarter view: shows depth and a second side.
  • Back: ingredients, nutrition table, technical data.
  • Detail: material, closure, texture, anything the front hides.
  • Set or bundle: everything in the box, and nothing that isn’t.
  • Lifestyle: the product in use, as an additional view only.

Aspect ratio is the other variable. Zalando wants 1:1.44, upright, which suits clothing and shoes; the other three pages set no fixed ratio. If you sell on several marketplaces, produce one high-resolution master per view and crop it for each channel, rather than shooting or generating once per marketplace.

Three ways to create a packshot

There are three routes: photograph the product in a studio, render it from CAD files, or generate it with an AI model trained on photos of the product. They differ in what you need to start and in what stays exact.

Three routes to a packshot, compared
CriterionStudio shootRender from CAD filesAI model trained on your product
What you needThe physical product, a studio, light, retouching3D files: .glb, .obj, .fbx or .stlOne photo of the product, ideally 2–5; smartphone photos work
Physical sample needed?YesNoYes, for the reference photos
New variant or seasonA new shoot or retouchingA new renderA new image from the same model
Label and fine printAs photographedAs accurate as the 3D fileCheck on every image
Cost basisDay rate or price per imageThe 3D files, then the renderCredits per image; training is free

Studio shoot: you need the product, the light and a cut-out

A studio shoot photographs the real product, so it shows the real product. You need the item in its final packaging, controlled light, a white backdrop and retouching: cut-out, pure white background, dust and reflections removed. For one hero product or a label that must be exact, it is the straightest route. You usually pay a day rate or a price per image, and you pay again with every new colour, variant or packaging. What commissioned 3D work costs by comparison is in our guide on 3D rendering cost, studio or AI.

Render from CAD files: no physical sample needed

If the product already exists as 3D data, you can have packshots before the first sample leaves production. Samsa’s 3D rendering from CAD files takes .glb, .obj, .fbx and .stl files. An uploaded model keeps its geometry and camera exactly, and a render is billed like any image at the same quality tier. The limit is the model itself: materials, printed labels and colours are only as accurate as the 3D file.
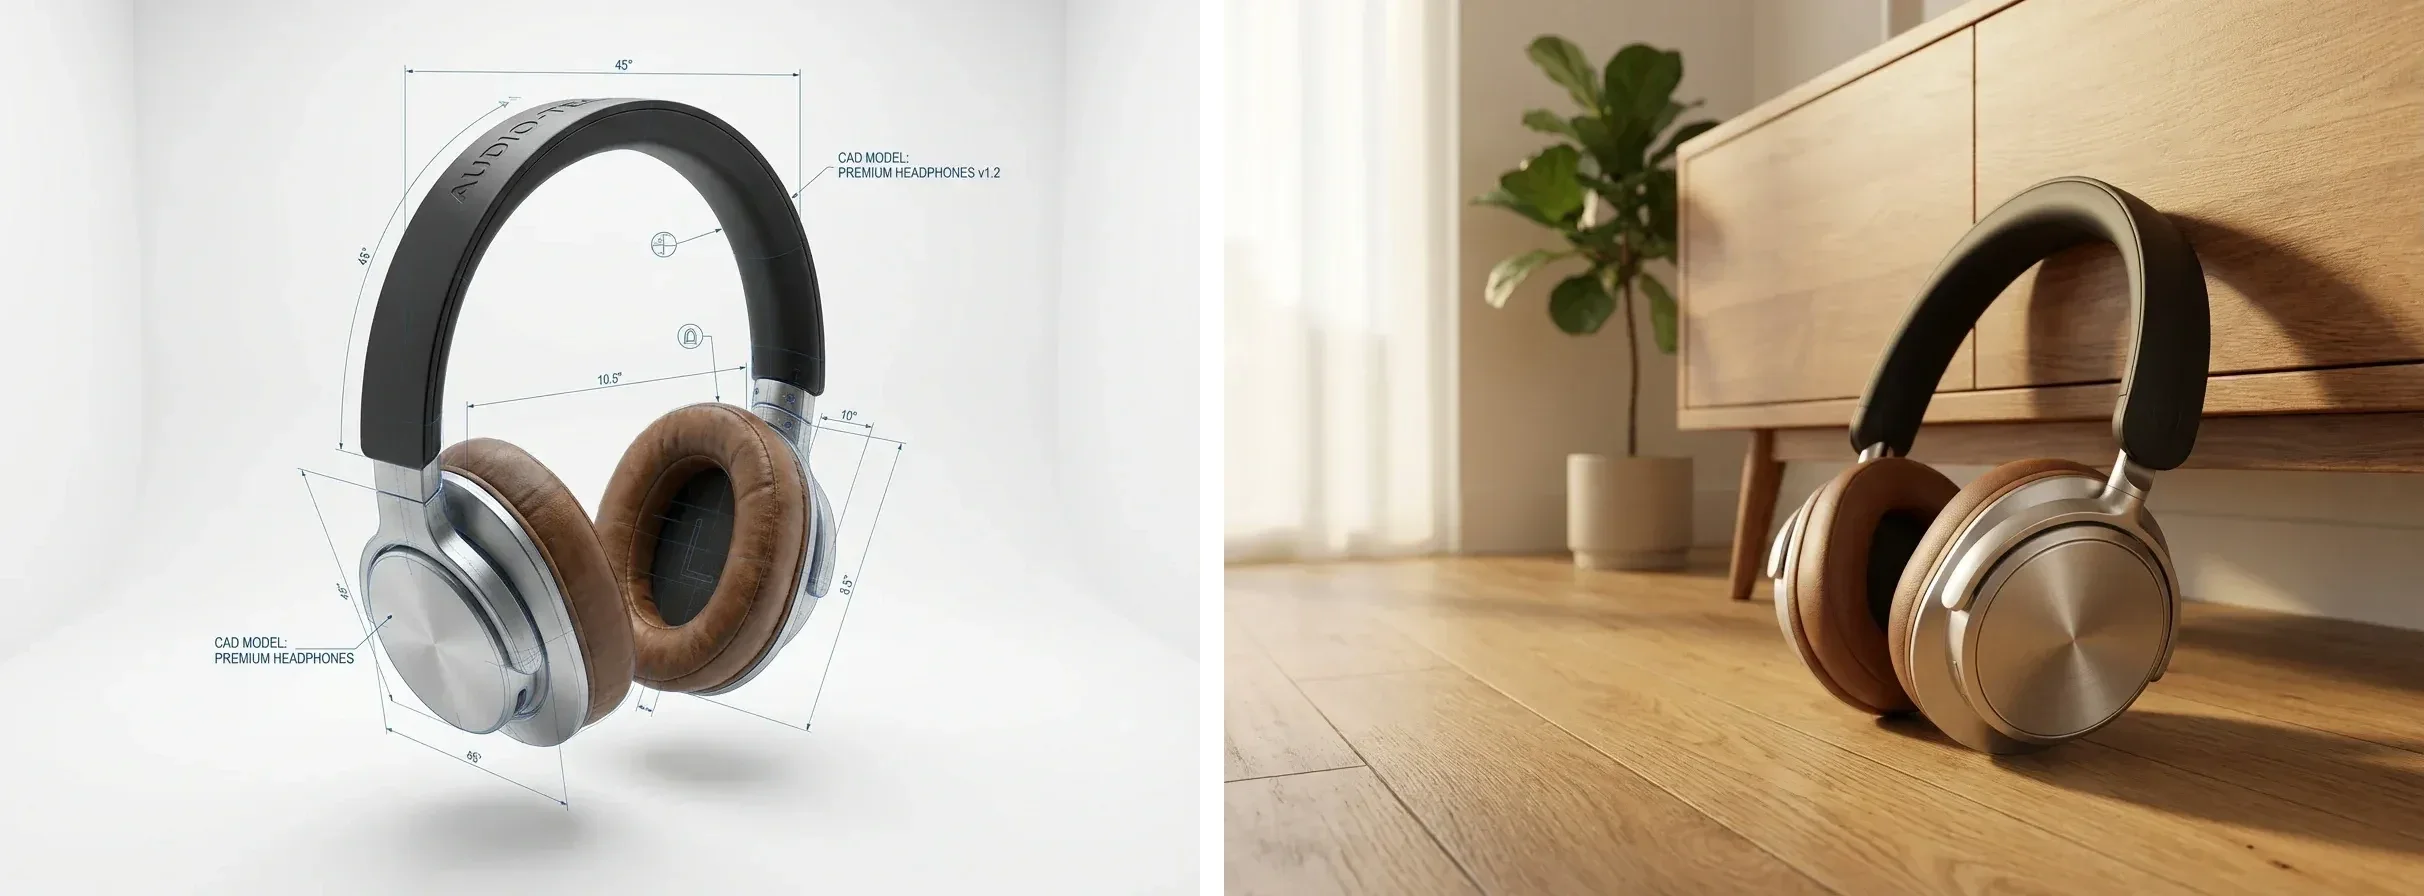
Over-ear headphones as a model view with dimension lines, next to the same headphones rendered on an oak floor in a living room
From 3D model to product image, with no physical sample in the room. Example generated with Samsa, not a customer project.

AI model trained on your product: one photo works, 2–5 are better

The third route starts from photos of the real product. You train an AI model on your product with one reference photo, or two to five for the best results, and smartphone photos are fine. Training is free and unlimited on every plan and takes about 15 seconds. You don’t need a 3D model. The trained model then places the product in whatever you set up or pick from a preset: a pure white packshot, a three-quarter view, a seasonal scene. Which angles and backgrounds to shoot is covered in the guide to preparing images for AI training.
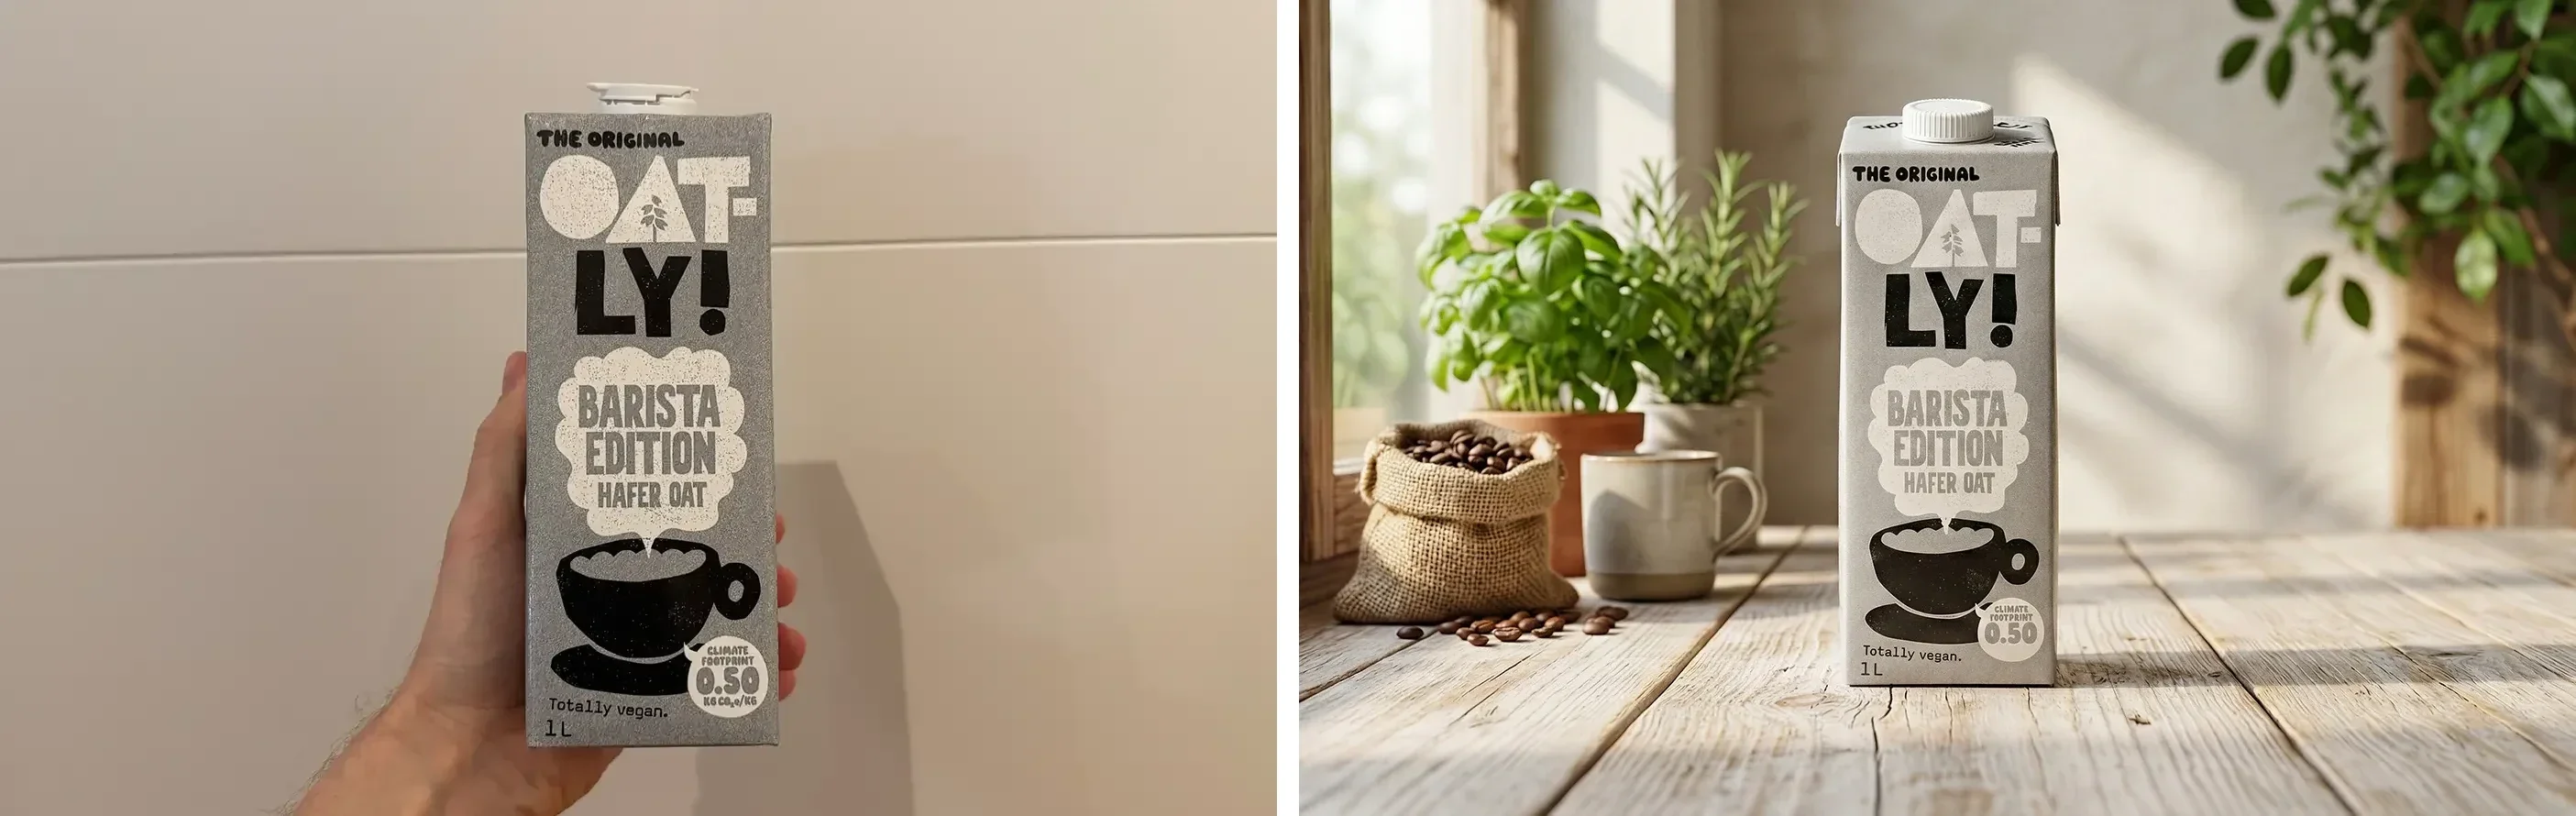
A hand holding an oat drink carton in front of a tiled wall, next to the same carton on a sunlit wooden table with herbs and a mug
Left the smartphone reference photo, right an image generated from it. Example generated with Samsa, not a customer project.

Studio shoot or AI: which route fits which job?

The product and the job decide the route. Four questions settle most cases:

  1. Is there a physical sample? No sample but CAD data: render. No sample and no data: every route waits for the sample.
  2. How many images, how often? One hero product, once: a studio booking is often simpler. New variants, colours and seasonal scenes every week: a trained model pays off, because every new image comes from the same model.
  3. How critical is the fine print? For regulated labels, nutrition tables and legal text, photograph the product, or check every AI image against the real pack.
  4. Which marketplace? Read its size, format and background rules before you pick a route, not after.

Samsa’s AI product photography with the Packshot Studio is built for the second case, teams that need new product images every week. It has 37 presets, 20 seasonal presets and 8 controls: background, lighting, camera angle, surface, shadows, reflections, composition and theme.

How to create a packshot with AI, step by step

Four steps take you from a phone photo to a packshot ready for upload.

  1. Photograph the product. One photo works; two to five from different angles work best. Even light, the whole product in frame, the label readable.
  2. Train the model. Free, unlimited, about 15 seconds.
  3. Generate in the Packshot Studio. Pick a preset or set the 8 controls yourself. For a main image: white background, frontal camera angle, no props. One preset is called “Amazon Ready”; Amazon’s current rules are still yours to check.
  4. Export and check. Export as JPG (WebP and PNG are also available), compare the pixel size with the marketplace minimum, and set the background to pure white where the rules ask for it.

Each image costs 5 credits at 1K, 10 at 2K and 20 at 4K.

What to check before you upload an AI packshot

An AI packshot is ready once you have checked it against the real product and the marketplace’s rules; the model doesn’t do that for you. Five checks:

  • Label and fine print. A model reproduces what it learned from your photos. Compare label text, legal notes, nutrition tables and colours with the real pack on every image.
  • The product as sold. The main image shows exactly what the buyer gets. Google bans products not sold together with the item; Galaxus bans several variants in one image.
  • Size and background. Pixel size against the minimum in the table above; #FFFFFF where the rules require it.
  • Rights to your photos. Commercial use is allowed on every plan, provided you hold the rights to the images you train on.
  • Marking. Samsa marks its outputs with C2PA Content Credentials and an imperceptible watermark.

Who decides

Whether a marketplace accepts an image is that marketplace’s decision. No preset name and no guide, this one included, guarantees that a packshot passes review. Check the current rules before each upload.

Packshot FAQ

What background does a packshot need?

Pure white (#FFFFFF) is the safe choice, and Zalando makes it mandatory: R255 G255 B255 for its catalogue packshot. Galaxus wants a cut-out, ideally frontal on white, and Amazon’s seller guide asks for white in most cases. Google Merchant Center sets no colour, only a clean view without borders, so a pure white background works on all four.

Can I create packshots without the physical product?

Yes, if you have 3D files of the product or its packaging. Samsa’s 3D Rendering Studio renders packshots from .glb, .obj, .fbx and .stl files, and the uploaded model keeps its geometry and camera exactly. Without 3D files, the AI route needs at least one photo of the real product. More on 3D rendering from CAD files.

How many photos do I need to train an AI model on my product?

One photo is enough to start. Two to five photos from different angles give the best results, and smartphone photos work. Training is free and unlimited on every plan and takes about 15 seconds, so if the first result misses a detail, you can add better photos and train again at no cost.

Can I use AI-generated packshots commercially?

Yes, on every Samsa plan, provided you hold the rights to the images you train your model on. If the reference photos come from a photographer or an agency, check that your licence covers this use. Every output also carries C2PA Content Credentials and an imperceptible watermark, which mark it as AI-generated.

What does a packshot cost with AI?

At Samsa an image costs 5 credits at 1K, 10 at 2K and 20 at 4K. Plans start at CHF 39 per month billed yearly, or CHF 49 billed monthly, for 500 credits a month: about 100 images at 1K. Prices exclude VAT. Training your model is free. Creating an account is free too, but it includes no credits. See the credit prices per plan.

Sources

  1. Packshot — Wikipedia, accessed 30 September 2026
  2. Image link [image_link] — Google Merchant Center Help, accessed 30 September 2026
  3. Zalando image guidelines — Zalando Partner University, accessed 30 September 2026
  4. 6 Product Data quality guidelines — Digitec Galaxus, Partner Integration documentation, accessed 30 September 2026
  5. 6 tips for taking product photos in 2025 — Amazon, Sell on Amazon, accessed 30 September 2026

Create packshots from one photo of your product

Train a model on your product for free, then generate packshots with 37 presets and 8 controls. Create your account (free); images use your plan’s credits.

See the Packshot Studio

# What is a packshot? Requirements, formats and how to create one

> What a packshot is, what Amazon, Google Shopping, Zalando and Galaxus require, and when a studio shoot, a CAD render or an AI model is the better route.

Language: English · Machine index: [https://samsa.ai/llms.txt](/llms.txt)

---

A packshot is a clean, true-to-life image of a product and its packaging, usually shown alone on a plain white background. Marketplaces set the rules: Zalando requires pure white (#FFFFFF) and at least 762 × 1,100 pixels; Google Merchant Center wants at least 500 × 500 pixels, with the product filling 75–90% of the frame. You can shoot it in a studio, render it from CAD files or generate it with an AI model trained on your product.

Niklas Jung · Founder & CEO, Samsa Published 2026-09-30 · 13 min read

---

## What is a packshot?

A packshot is the product image whose only job is recognition: the product, usually with its packaging and label, shown on its own, evenly lit, with no scene around it. Wikipedia defines it as a still or moving image of a product, usually including its packaging and labelling, used in TV and other advertising to trigger recognition in store and on the shelf.

In e-commerce the word has narrowed to the main product image, the one shown first on a product page and in search results, and that is the image marketplaces write rules for. A packshot is a spec, not a style. Know your marketplace’s rules and the production route follows.

### Packshot, product shot, cut-out: the terms

- Packshot (also pack shot): the neutral, standardised image of a product, usually with its packaging. In an online shop, the main image.

- Product shot: any photo whose subject is the product, staged scenes included. Every packshot is a product shot, not the other way round.

- Cut-out (or clipping): the product separated from its background, so it can sit on pure white or on a transparent background. Most studio packshots are cut out after the shoot.

- 360° spin: a sequence of frames around the product that the viewer can rotate, shot on a turntable or rendered from a 3D model. A format of its own, not a packshot.

---

## Packshot or lifestyle shot: what’s the difference?

A packshot shows only the product, neutral and standardised; a lifestyle shot shows it in a setting or in use, to create a mood. Marketplaces want the packshot as the main image and file lifestyle shots under additional views. Zalando says so directly: an image with ambient styling is not a compliant packshot and can only be used as an additional view.

The two do different jobs. In a search grid, the packshot tells the shopper this is the product they were looking for; on the product page and in ads, the lifestyle shot shows what owning it is like. A catalogue needs both, and its packshots need to match from product to product: same light, same angle, same margins.

*(image: Left, a caffè latte cup alone on a light backdrop; right, a mate can with ice cubes on a weathered blue wooden table)*

Left a packshot, right a lifestyle shot. The packshot’s backdrop is a light grey, about RGB 232 to 250, not pure white, so Zalando’s catalogue image would still need a #FFFFFF background. Examples generated with Samsa, not customer projects.

---

## What do marketplaces require for a packshot?

Every marketplace publishes its own image rules, and they differ more than most guides admit: of the four below, only Zalando makes pure white mandatory, and the minimum sizes run from 500 pixels on the longest side to 762 × 1,100 pixels. Values as published on each marketplace’s own pages on 30 September 2026.

**Packshot rules of four marketplaces, from their own guidelines, as of 30 September 2026**

| Rule | Google Merchant Center | Zalando (catalogue packshot) | Galaxus (main image) | Amazon |

| --- | --- | --- | --- | --- |

| Background | No colour rule; no borders | Pure white, R255 G255 B255 / #FFFFFF, mandatory | Cut-out, ideally frontal on white | White, RGB 255, 255, 255, “in most cases” |

| Minimum size | 500 × 500 px | 762 × 1,100 px | 600 px on the longest edge, without margins | 500 px on the longest side (max. 10,000) |

| Recommended size | About 1,500 × 1,500 px or more | 1,801 × 2,600 px (designer brands: at least 1,800 × 2,600) | – | Over 1,000 px on each side, for zoom |

| Product fill | 75–90% of the image | – | – | 85% of the frame or more |

| Aspect ratio | – | 1:1.44, upright | – | – |

| File formats | JPEG, WebP, PNG, GIF, BMP, TIFF | JPG/JPEG | JPG, JPEG, PNG | JPEG preferred; TIFF, PNG, non-animated GIF |

| Max. file size | 16 MB and 64 megapixels | 20 MB | 8 MB | – |

| Colour space | – | sRGB | – | – |

| Not allowed | Borders, watermarks, calls to action, prices and offers, logos added in post-production, placeholders, products not sold together | Ambient styling, visible mannequins or hangers, black-and-white, cropping of the article on the primary packshot | Placeholders, advertising text, logos, watermarks, awards, generic illustrations, several variants in one image | Listed in Seller Central (seller login) |

A dash means the page sets no value, not that anything goes. Zalando’s guide is the general one; beauty, accessories, electronics and other categories have their own. Amazon’s figures come from its public seller guide on product photos; the binding main-image rules sit in Seller Central, behind a seller login.

### Background: pure white, and why the rules differ

Pure white means RGB 255, 255, 255 (#FFFFFF). Zalando requires exactly that for its catalogue packshot, then adds its own light grey background in the shop so every product page looks the same. Galaxus asks for a cut-out on white, Amazon for white in most cases, and Google sets no colour at all, only a clean view without borders.

Pure white rarely comes straight out of the camera. A white backdrop often records as light grey, like the backdrop in the example above, so studios cut the product out and set the background to #FFFFFF afterwards. Rendered and AI images need the same check: look at the corner pixels before you upload. [Background removal](/edit/) does the cut-out in one step.

### Image size, product fill and zoom

The minimums are easy to meet; plan for the recommended sizes instead, such as the more than 1,000 pixels per side Amazon prefers so shoppers can zoom. Product fill decides how big the product looks in a search grid: 75 to 90% of the image at Google, 85% or more at Amazon. Galaxus measures its 600 pixels without the margins around the product, so a small product in a wide white field can miss the minimum even when the file itself is large.

### File formats, colour space and file size

JPEG is the one format all four accept, and the only one Zalando takes. The tightest file size cap is Galaxus’ 8 MB, and Zalando is the only one of the four that names a colour space, sRGB. Samsa exports WebP, JPG and PNG; for a marketplace upload, JPG is the safe choice, and for Zalando check that the file is sRGB.

### What is not allowed on the main image?

The bans are much the same everywhere: nothing on the image that isn’t the product. No calls to action such as “Buy now”, no prices, no watermarks, no logos added afterwards, no placeholders. On top, Google excludes products not sold with the item, Galaxus several variants in one image, and Zalando mannequins, hangers and any cropping of the article on the primary packshot.

---

## Which views and formats does a product need?

One frontal main image is the minimum, and most marketplaces want more. Zalando asks for three compliant images for most apparel and accessories, and Amazon says every product must have at least one image and recommends at least six. A practical set for product photography on a white background:

- Front: the main image, straight on, label readable.

- Three-quarter view: shows depth and a second side.

- Back: ingredients, nutrition table, technical data.

- Detail: material, closure, texture, anything the front hides.

- Set or bundle: everything in the box, and nothing that isn’t.

- Lifestyle: the product in use, as an additional view only.

Aspect ratio is the other variable. Zalando wants 1:1.44, upright, which suits clothing and shoes; the other three pages set no fixed ratio. If you sell on several marketplaces, produce one high-resolution master per view and crop it for each channel, rather than shooting or generating once per marketplace.

---

## Three ways to create a packshot

There are three routes: photograph the product in a studio, render it from CAD files, or generate it with an AI model trained on photos of the product. They differ in what you need to start and in what stays exact.

**Three routes to a packshot, compared**

| Criterion | Studio shoot | Render from CAD files | AI model trained on your product |

| --- | --- | --- | --- |

| What you need | The physical product, a studio, light, retouching | 3D files: .glb, .obj, .fbx or .stl | One photo of the product, ideally 2–5; smartphone photos work |

| Physical sample needed? | Yes | No | Yes, for the reference photos |

| New variant or season | A new shoot or retouching | A new render | A new image from the same model |

| Label and fine print | As photographed | As accurate as the 3D file | Check on every image |

| Cost basis | Day rate or price per image | The 3D files, then the render | Credits per image; training is free |

### Studio shoot: you need the product, the light and a cut-out

A studio shoot photographs the real product, so it shows the real product. You need the item in its final packaging, controlled light, a white backdrop and retouching: cut-out, pure white background, dust and reflections removed. For one hero product or a label that must be exact, it is the straightest route. You usually pay a day rate or a price per image, and you pay again with every new colour, variant or packaging. What commissioned 3D work costs by comparison is in our guide on [3D rendering cost, studio or AI](https://samsa.ai/guides/3d-rendering-cost/).

### Render from CAD files: no physical sample needed

If the product already exists as 3D data, you can have packshots before the first sample leaves production. Samsa’s [3D rendering from CAD files](/3d-visualization/) takes .glb, .obj, .fbx and .stl files. An uploaded model keeps its geometry and camera exactly, and a render is billed like any image at the same quality tier. The limit is the model itself: materials, printed labels and colours are only as accurate as the 3D file.

*(image: Over-ear headphones as a model view with dimension lines, next to the same headphones rendered on an oak floor in a living room)*

From 3D model to product image, with no physical sample in the room. Example generated with Samsa, not a customer project.

### AI model trained on your product: one photo works, 2–5 are better

The third route starts from photos of the real product. You [train an AI model on your product](/train/) with one reference photo, or two to five for the best results, and smartphone photos are fine. Training is free and unlimited on every plan and takes about 15 seconds. You don’t need a 3D model. The trained model then places the product in whatever you set up or pick from a preset: a pure white packshot, a three-quarter view, a seasonal scene. Which angles and backgrounds to shoot is covered in the guide to [preparing images for AI training](https://samsa.ai/guides/train-ai-on-brand-guidelines/).

*(image: A hand holding an oat drink carton in front of a tiled wall, next to the same carton on a sunlit wooden table with herbs and a mug)*

Left the smartphone reference photo, right an image generated from it. Example generated with Samsa, not a customer project.

---

## Studio shoot or AI: which route fits which job?

The product and the job decide the route. Four questions settle most cases:

1. Is there a physical sample? No sample but CAD data: render. No sample and no data: every route waits for the sample.

2. How many images, how often? One hero product, once: a studio booking is often simpler. New variants, colours and seasonal scenes every week: a trained model pays off, because every new image comes from the same model.

3. How critical is the fine print? For regulated labels, nutrition tables and legal text, photograph the product, or check every AI image against the real pack.

4. Which marketplace? Read its size, format and background rules before you pick a route, not after.

Samsa’s [AI product photography with the Packshot Studio](/product-photography/) is built for the second case, teams that need new product images every week. It has 37 presets, 20 seasonal presets and 8 controls: background, lighting, camera angle, surface, shadows, reflections, composition and theme.

---

## How to create a packshot with AI, step by step

Four steps take you from a phone photo to a packshot ready for upload.

1. Photograph the product. One photo works; two to five from different angles work best. Even light, the whole product in frame, the label readable.

2. Train the model. Free, unlimited, about 15 seconds.

3. Generate in the Packshot Studio. Pick a preset or set the 8 controls yourself. For a main image: white background, frontal camera angle, no props. One preset is called “Amazon Ready”; Amazon’s current rules are still yours to check.

4. Export and check. Export as JPG (WebP and PNG are also available), compare the pixel size with the marketplace minimum, and set the background to pure white where the rules ask for it.

Each image costs 5 credits at 1K, 10 at 2K and 20 at 4K.

---

## What to check before you upload an AI packshot

An AI packshot is ready once you have checked it against the real product and the marketplace’s rules; the model doesn’t do that for you. Five checks:

- Label and fine print. A model reproduces what it learned from your photos. Compare label text, legal notes, nutrition tables and colours with the real pack on every image.

- The product as sold. The main image shows exactly what the buyer gets. Google bans products not sold together with the item; Galaxus bans several variants in one image.

- Size and background. Pixel size against the minimum in the table above; #FFFFFF where the rules require it.

- Rights to your photos. Commercial use is allowed on every plan, provided you hold the rights to the images you train on.

- Marking. Samsa marks its outputs with C2PA Content Credentials and an imperceptible watermark.

> **Who decides** Whether a marketplace accepts an image is that marketplace’s decision. No preset name and no guide, this one included, guarantees that a packshot passes review. Check the current rules before each upload.

---

## Packshot FAQ

### What background does a packshot need?

Pure white (#FFFFFF) is the safe choice, and Zalando makes it mandatory: R255 G255 B255 for its catalogue packshot. Galaxus wants a cut-out, ideally frontal on white, and Amazon’s seller guide asks for white in most cases. Google Merchant Center sets no colour, only a clean view without borders, so a pure white background works on all four.

### Can I create packshots without the physical product?

Yes, if you have 3D files of the product or its packaging. Samsa’s 3D Rendering Studio renders packshots from .glb, .obj, .fbx and .stl files, and the uploaded model keeps its geometry and camera exactly. Without 3D files, the AI route needs at least one photo of the real product. More on [3D rendering from CAD files](/3d-visualization/).

### How many photos do I need to train an AI model on my product?

One photo is enough to start. Two to five photos from different angles give the best results, and smartphone photos work. Training is free and unlimited on every plan and takes about 15 seconds, so if the first result misses a detail, you can add better photos and train again at no cost.

### Can I use AI-generated packshots commercially?

Yes, on every Samsa plan, provided you hold the rights to the images you train your model on. If the reference photos come from a photographer or an agency, check that your licence covers this use. Every output also carries C2PA Content Credentials and an imperceptible watermark, which mark it as AI-generated.

### What does a packshot cost with AI?

At Samsa an image costs 5 credits at 1K, 10 at 2K and 20 at 4K. Plans start at CHF 39 per month billed yearly, or CHF 49 billed monthly, for 500 credits a month: about 100 images at 1K. Prices exclude VAT. Training your model is free. Creating an account is free too, but it includes no credits. See the [credit prices per plan](/pricing/).

---

## Sources

1. [Packshot](https://en.wikipedia.org/wiki/Packshot) — Wikipedia, accessed 2026-09-30

2. [Image link [image_link]](https://support.google.com/merchants/answer/6324350?hl=en) — Google Merchant Center Help, accessed 2026-09-30

3. [Zalando image guidelines](https://partner.zalando.com/university/article/zalando-image-guidelines) — Zalando Partner University, accessed 2026-09-30

4. [6 Product Data quality guidelines](https://confdg.atlassian.net/wiki/spaces/PI/pages/168665885851/6+Product+Data+quality+guidelines) — Digitec Galaxus, Partner Integration documentation, accessed 2026-09-30

5. [6 tips for taking product photos in 2025](https://sell.amazon.com/blog/product-photos) — Amazon, Sell on Amazon, accessed 2026-09-30

---

**Create packshots from one photo of your product** Train a model on your product for free, then generate packshots with 37 presets and 8 controls. Create your account (free); images use your plan’s credits. [See the Packshot Studio](/product-photography/)